


0 of 0
About this mod
Randomizes enemies (including bosses and minibosses) and items (including key items and skills)
- Permissions and credits
This mod has basic compatibility with Sekiro v1.06, except for reflections and gauntlets.
A comprehensive enemy and item randomizer for Sekiro, including boss randomization and key item randomization.
Things to definitely know for item randomizer
- The first castle invasion starts when you have Mortal Blade, Shelter Stone, and Lotus of the Palace; you have Isshin asked about the Mortal Blade location in the watchtower (talked to him twice); and you are in Senpou Temple/Sunken Valley/Ashina Depths/Hirata Temple.
- You can get into Ashina Castle after the first invasion even if you can't swim underwater, through the Ashina Reservoir gate
- To enter Hirata Estate without the Shinobi Prosthetic, do a running jump, holding forward the whole time, onto the tree branch you could otherwise grapple onto (see https://streamable.com/u7d7y). If you get stuck in water, you may have to use Homeward Idol to get out.
Things to definitely know for enemy randomizer
- Game progression things that apply to enemies will apply to their replacements instead. e.g. killing Guardian Ape's replacement will spawn Headless Ape's replacement.
- Armored Warrior will now fall off the edge of anything the game considers a floor collision. This is easiest off of ledges/cliffs. If there is no ledge/cliff, kick him into a wall or a rock. He only shows up in arenas where this is possible, but you may have to try a few spots.
If you have issues installing the mod, or would like to provide feedback/participate in beta tests, you can join the discord server at https://discord.gg/QArcYud
Installation
To install and run:
1. From the Files tab of the mod page, download Sekiro Randomizer, and also the latest official Sekiro Mod Engine release. You will also need to download Combined SFX if you haven't unpacked the game using UXM, and Divine Dragon Textures if you want Divine Dragon to have textures when randomized.
2. Add the randomizer directory directly into the Sekiro.exe directory from SekiroRandomizer.zip (*not* into an existing mods or parts directory).

3. Install Sekiro Mod Engine. If the last time you downloaded a version of Mod Engine was before November 2020, you must the new official version instead. It allocates 200 MB additional memory for sound files and is required for avoiding crashes. It should suffice to copy dinput8.dll and modengine.ini into your Sekiro directory.

4. Change modengine.ini to have modOverrideDirectory="\randomizer", if it's not already.
5. All enemy sfx should be combined, since otherwise many of their attacks won't be visible. There are two ways to do this.
5a. Download CombinedSFX.zip (76 MB download) and extract the sfx directory into the randomizer directory.

5b. Alternatively, unpack Sekiro using UXM (needs about 14 GB disk space) and the randomizer will combine the SFX automatically on startup. This will take a few seconds. (After this, the sfx directory should match the above screenshots.)
6. Likewise, you can download the Divine Dragon texture files (18 MB download) so that more of the textures appear when Divine Dragon is moved to other maps. This doesn't affect the enemy, just the Sakura trees around it.
7. Run the randomizer, checking "Reroll seed" to create a new run. If you plan on using other mods: use the "Merge mods" option under Misc. (For instance, if you have a mod with text edits or param edits, put the files in mods folder, not randomizer folder.) Never copy files into the randomizer if they already exist there, because they will not be merged correctly and will break your game. For Poorly Translated Mod, make sure to uncheck "Edit in-game text".

8. Make sure that the randomizer succeeds (shows "Done" in the status bar), and then close Sekiro if you have it open, and start up Sekiro for changes to be reflected, and create a new save file.
To uninstall, change back modOverrideDirectory="\mods", or delete the randomizer directory. The new version of mod engine will also work for previous mods, if you don't mind the extra memory allocation.
Gameplay details
To repeat "Things to definitely know" from above:
Things to definitely know for item randomizer
- The first castle invasion starts when you have Mortal Blade, Shelter Stone, and Lotus of the Palace; you have Isshin asked about the Mortal Blade location in the watchtower (talked to him twice); and you are in Senpou Temple/Sunken Valley/Ashina Depths/Hirata Temple.
- You can get into Ashina Castle after the first invasion even if you can't swim underwater, through the Ashina Reservoir gate
- To enter Hirata Estate without the Shinobi Prosthetic, do a running jump, holding forward the whole time, onto the tree branch you could otherwise grapple onto (see https://streamable.com/u7d7y). If you get stuck in water, you may have to use Homeward Idol to get out.
Things to definitely know for enemy randomizer
- Game progression things that apply to enemies will apply to their replacements instead. e.g. killing Guardian Ape's replacement will spawn Headless Ape's replacement.
- Armored Warrior will now fall off the edge of anything the game considers a floor collision. This is easiest off of ledges/cliffs. If there is no ledge/cliff, kick him into a wall or a rock. He only shows up in arenas where this is possible, but you may have to try a few spots.
If you encounter any issues, like softlocks from inaccessible items or unbeatable enemies, feel free to report a bug. It will help a lot if you include the log in the 'spoiler_logs' folder, or at least the full first line of the log (starting with "Options and seed"). The seed by itself probably won't help.
Here are some misc hints and tips, but not strictly required to know:
Misc general info
- There is a hint/spoiler log that is generated and put in the 'spoiler_logs' folder. Check it out if you are lost or want to check enemy placements.
- For convenience, tutorials pop-ups have been removed.
- It should be fine to re-run the randomizer with a different seed after starting NG+ playthroughs, although some bugs may arise if multiple items are added to the same location.
- The "Open Bell Demon's Temple" option allows you to get to Ashina Castle without defeating Gyoubu, although you must eventually go back to complete Isshin's quest. See https://streamable.com/fywve for a demonstration of this.
Misc info about enemy randomizer
- Sword Saint Isshin, Divine Dragon, and True Monk don't require Mortal Blade to deathblow.
- You can get to Genichiro, skipping Ashina Elite Jinsuke Saze, by going through a breakable wall down the stairs from the Ashina Dojo idol toward Isshin's watchtower
Misc info about item randomizer
- Remember that additional enemies spawn in Guardian Ape's Burrow after defeating Guardian Ape, and Fujioka will also sell Valley Apparitions Memo when the final enemy spawns.
- Item logic assumes that you can get into Sunken Passage Serpent Shrine if you have either Puppeteer Ninjutsu or Mist Raven's Feathers.
- There are options like 'Item availability similar to base game' which I would strongly recommend. Otherwise, at high biases, it is possible for e.g. all Gourd Seeds and Memories to be in Fountainhead Palace.
There are also some features I'm looking to implement in the future. Let me know if any of these would be interesting, or if you have any other suggestions:
- Enemy Onslaught
- Randomizing Bell Demon, Kusabimaru, or Healing Gourd
- Adding boss vs boss or multi-boss fights
If you're looking for a different way to do randomizer runs, try out Sekiro Randomizer Bingo by DistractionCrab. The bingo is designed around winning when you get 5 squares in a row, so getting to an ending is not required. You can mark a square as green if you achieve it, and mark it as red if you violate its restrictions.
Presets
The randomizer can be heavily customized using text files in the 'presets' folder. These can be selected in the UI under "Challenge runs" and add some significant challenge or fun to runs. You can also create your own: there is a template you can copy. Check out README.txt in the presets folder to learn more. In v0.2 presets are more focused on enemy randomization, but there is some item randomizer customization support, and more coming in the future. Built-in presets include:
- 10% Boss Replacement: The same as regular randomization except that 10% of enemies are upgraded to bosses
- Ashina Zoo: Replace all enemies and bosses with animals and occasionally some animal caretakers
- Nightmare Mode: The worst run with the most annoying and challenging enemies which might be possibly doable
- No Demon of Hatred: The same as regular randomization but prevent Demon of Hatred from appearing
- Oops! All: All enemies in the game are replaced with a specific enemy type
- Reverse Enemy Order: Place all enemies in the game roughly based on how soon you can find them in a full playthrough, but in reverse order
The NPC definition for regular enemies can become slightly buffed when they become minibosses or bosses, so as always, it is important to restart the game after applying one of these so that they are reflected.
In-game hints
In English, item descriptions of otherwise nonfunctional lore items will be slightly altered to provide hints for the placement of other items. This will also edit the text of all readable notes in the world, like the Headless warning sign, the Lightning Reversal scroll, and the Folding Screen Monkey hints.The hints are balanced so they require some deductive reasoning and not spoil too much of the run. There is no guarantee that hints can always be found before they are needed, since the placement of hint items in the world is completely random. The hints are split up into these categories:
- Positive location hints: An item can be found in a location type in a location. Location types includes chests, underwater, treasure (item pickup on the ground or gift), boss, miniboss, powerful enemy (includes bosses and minibosses), and in shops. These hints exist for some important optional items (like Mikiri Counter, Shuriken, Firecrackers), but if a key item name is given, that item is required to beat the run.
- Lateness hints: A specific item can be found early/late/midway through the game. These hints are transitive, so Hirata can be considered late-game if the Bell Charm is in Fountainhead Palace. The definition of early items are those which can be acquired before reaching Ashina Castle through Blazing Bull; late items cannot be acquired until after you reach Fountainhead Palace; mid items are neither.
- Negative location hints: The given location doesn't have any important items at all, using the above definition of important items (key items required to beat the final Immortal Severence boss, or an important skill). These are kept as general as possible, so if the hint is for Gun Fort not having an important item, it's probably the case that Bodhisattva Valley might have one, since otherwise the hint would say all of Sunken Valley.
- Negative type hints: The particular type of location doesn't have any important items in the entire game. For instance, this might say that you don't have to search underwater or look in shops.
- Negative location type hints: The given location doesn't have important items in a certain location type. This is also kept as general as possible, so if the hint is for minibosses in Hirata Estate, it's probably the case that other locations in Hirata Estate will have something instead (since otherwise the hint would say the entirety of Hirata Estate), and also probably the case that a boss will have it (since otherwise the hint would say powerful enemies).
Acknowledgements
The fantastic art in the randomizer UI (the title and hand-drawn characters) was made specially for the randomizer by Souv, who has also created many wonderful emotes for the FromSoft modding discord server (https://discord.gg/mT2JJjx). Thanks to JesterPatches, Tolvo, and Shoobe for their valuable alpha testing feedback, DistractionCrab for testing feedback for later versions, and JP for some of the lovely screenshots as well. Thanks to katalash, who made DSTools and DSMapStudio and made a version of Mod Engine which fixed the audio crashes. Thanks to TKGP and Pav and others for SoulsFormats and Paramdex, and Pav for the CE table which was useful for testing. Thanks to HotPocketRemix and Meowmaritus and AinTunez for developing tools for event script editing which this mod uses. Thanks to everyone else who helped debug issues and provide feedback. The initial version of this project took 3-4 months of development time and makes some really advanced dynamic edits to game scripts and systems, and with the things we've learned, I'd love to see more gameplay-oriented Sekiro mods like it.
Finally check out the source code on GitHub.
Key items
Key items are defined as items which unlock other unmissable items. They are only placed in unmissable locations, which excludes many of the game's non-main quests. These items, and no others, can block your progress in the randomizer until you find them, with the ultimate goal of defeating the final Immortal Severence boss and getting to the credits.
- Aromatic Branch: One of the four incense ingredients used to access Fountainhead Palace
- Divine Dragon's Tears: Used to end the game when talking to Kuro in the silvergrass field
- Father's Bell Charm: Used to revisit Hirata after Lady Butterfly has already been defeated
- Gatehouse Key: Used to access the locked building in Ashina Reservoir
- Gun Fort Shrine Key: Used to access Sunken Valley Passage after Gun Fort
- Hidden Temple Key: Used to access the Lady Butterfly fight from Hirata Estate
- Lotus of the Palace: One of three incense ingredients used to trigger the Interior Ministry invasion, and one of four used to access Fountainhead Palace
- Mibu Breathing Technique: Used to access many underwater areas in the game (in Fountainhead Palace, Hirata Estate, Senpou Temple Grounds, Mibu Village, Ashina Castle, Ashina Reservoir, Abandoned Dungeon, Riven Cave, Guardian Ape's Watering Hole, and the Sunken Valley Headless)
- Mist Raven's Feathers: Can be used to get past the cave snake in Sunken Valley Passage
- Mortal Blade: One of three incense ingredients used to trigger the Interior Ministry invasion, and one of four used to access Fountainhead Palace
- Puppeteer Ninjutsu: Can be used to get past the cave snake in Sunken Valley Passage, and access Sunken Valley Cavern from Senpou Temple
- Secret Passage Key: Used to access the final boss
- Shelter Stone: One of three incense ingredients used to trigger the Interior Ministry invasion, and one of four used to access Fountainhead Palace
- Shinobi Prosthetic: Required to access most of the game past Dilapidated Temple and some early parts of Hirata Estate
- Truly Precious Bait: Used in Fountainhead Palace to unlock an item in Sunken Valley Passage
- Young Lord's Bell Charm: Used to access Hirata Estate from Dilapidated Temple
You can use Sekiro Tracker by DistractionCrab for keeping track of key items collected in a run, for streams and/or personal record-keeping.
Important locations
Some items have the option to be placed in "important locations". This can be used for shorter runs or live races. If enabled, all of the same item logic still applies, so it shouldn't be possible to get softlocked. Generally, these include the vanilla locations of bosses, minibosses, prayer beads, gourd seeds, prosthetics, esoteric texts, key items, and serpent viscera. Currently, they are:
In Dilapidated Temple: Given upon arriving in Dilapidated Temple. Replaces Shinobi Prosthetic.
In Dilapidated Temple: Unique initial item sold by Fujioka the Info Broker. Replaces Gourd Seed.
In Dilapidated Temple: Given by the Sculptor after acquiring 1 skill point. Replaces Shinobi Esoteric Text.
In Dilapidated Temple: Given by the Sculptor after collecting 3 prosthetic tools. Replaces Prosthetic Esoteric Text.
In Ashina Outskirts Gate Path: On the second floor of the building next to the Gate Path Sculptor's Idol, or in the Offering Box after the second invasion. Replaces Shuriken Wheel.
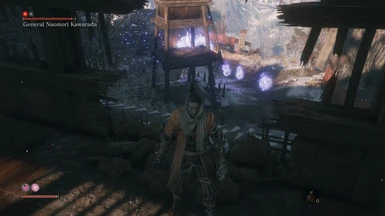
In Ashina Outskirts Gate Path: Dropped by General Naomori Kawarada, or in Offering Box after the Central Forces invasion. Replaces Gourd Seed, Prayer Bead.
In Ashina Outskirts Stairway: Unique item sold by Crow's Bed Memorial Mob and Battlefield Memorial Mob. Replaces Robert's Firecrackers.
In Ashina Outskirts Stairway: Given by Inosuke's Mother. Replaces Young Lord's Bell Charm.
In Ashina Outskirts Stairway: Unique location from Chained Ogre. Replaces Shinobi Medicine Rank 1, Prayer Bead.
In Ashina Outskirts Courtyard: In the left room of the lookout building after Chained Ogre. Replaces Gourd Seed.
In Ashina Outskirts Courtyard: Dropped by General Tenzen Yamauchi, or in the Offering Box after the Central Forces invasion. Replaces Prayer Bead.
In Ashina Castle Fortress: Unique location from Gyoubu Oniwa. Replaces Memory: Gyoubu Oniwa, Mechanical Barrel.
In Ashina Castle Gate: Unique item sold by Battlefield Memorial Mob. Replaces Gourd Seed.
In Ashina Castle Gate: Given by Tengu after killing rats, or in his spot in Ashina Castle if the quest is refused and after Divine Dragon. Replaces Ashina Esoteric Text.
In Ashina Castle Gate: Unique location from Blazing Bull. Replaces Shinobi Medicine Rank 2, Prayer Bead.
In Ashina Castle Gate: In a chest on the top floor of the building up the stairs after Gyoubu. Replaces Prayer Bead.
In Ashina Outskirts after Central Forces: Unique location from Demon of Hatred. Replaces Lapis Lazuli, Memory: Hatred Demon.
In Ashina Outskirts after Central Forces: Dropped by Shigekichi of the Red Guard. Replaces Prayer Bead.
In Ashina Reservoir: Dropped by a soldier on the bridge leading to the Abandoned Dungeon entrance, or in the courtyard immediately to the left after the Ashina Castle Sculptor's Idol. Replaces Gatehouse Key.
In Ashina Reservoir: Dropped by Seven Ashina Spears - Shikibu Toshikatsu Yamauchi, or in the Offering Box after the Central Forces invasion. Replaces Prayer Bead.
In Ashina Reservoir: Dropped by Lone Shadow Longswordsman. Replaces Prayer Bead.
In Ashina Reservoir: In the chest in Ashina Reservoir Gate House. Replaces Gyoubu's Broken Horn.
In Ashina Reservoir after Central Forces: Dropped by Seven Ashina Spears - Shume Masaji Oniwa. Replaces Prayer Bead.
In Ashina Reservoir Ending: Unique location from Sword Saint Isshin. Replaces Memory: Saint Isshin, Dragon Flash.
In Ashina Castle: Dropped by Genichiro. Replaces Memory: Genichiro, Bloodsmoke Ninjutsu.
In Ashina Castle: In the library area in Kuro's Room which opens up after you ask Isshin where the Mortal Blade can be found. Replaces Gun Fort Shrine Key.
In Ashina Castle: In a chest in the Upper Tower basement. Replaces Sabimaru.
In Ashina Castle: Sold by Blackhat Badger, or left behind after he moves to Senpou Temple, or in Offering Box if killed. Replaces Iron Fortress.
In Ashina Castle: In a chest before the Upper Tower Antechamber. Replaces Gourd Seed.
In Ashina Castle: Dropped by General Kuranosuke Matsumoto, or in the Offering Box after the Interior Ministry invasion. Replaces Prayer Bead.
In Ashina Castle: Dropped by Ashina Elite Jinsuke Saze, or in the Offering Box after the Interior Ministry invasion. Replaces Prayer Bead.
In Ashina Castle: In a chest past a scroll-covered shinobi door in the Upper Tower room where two fencers are studying a map. Replaces Prayer Bead.
In Ashina Castle after Interior Ministry: Unique location from Owl. Replaces Aromatic Branch, Memory: Great Shinobi.
In Ashina Castle after Interior Ministry: Dropped by Isshin Ashina. Replaces One Mind.
In Ashina Castle after Interior Ministry: Unique location from Chained Ogre. Replaces Shinobi Medicine Rank 3, Prayer Bead.
In Ashina Castle after Interior Ministry: Dropped by Lone Shadow Vilehand. Replaces Prayer Bead.
In Ashina Castle after Interior Ministry: Dropped by Lone Shadow Masanaga the Spear-bearer, or in the Offering Box after the Central Forces invasion. Replaces Prayer Bead.
In Ashina Castle after Central Forces: Given by Emma in Kuro's Room after Divine Dragon. Replaces Secret Passage Key.
In Ashina Castle after Central Forces: Dropped by Ashina Elite Ujinari Mizuo. Replaces Prayer Bead.
In Hirata Estate: Near the bandits' bonfire. Replaces Flame Barrel.
In Hirata Estate: In the shrine where you can eavesdrop bandits arguing about whether to loot the shrine. Replaces Shinobi Axe of the Monkey.
In Hirata Estate: Dropped by Shinobi Hunter Enshin of Misen. Replaces Prayer Bead.
In Hirata Estate: Dropped by Juzou the Drunkard. Replaces Prayer Bead.
In Hirata Audience Chamber: In a chest behind the scroll-covered shinobi door before the Audience Chamber. Replaces Prayer Bead.
In Hirata Estate Hidden Temple: Unique location from Lady Butterfly. Replaces Memory: Lady Butterfly, Sakura Droplet.
In Hirata Estate Revisited: Dropped by Lone Shadow Masanaga the Spear-bearer. Replaces Prayer Bead.
In Hirata Estate Revisited: Dropped by Juzou the Drunkard. Replaces Prayer Bead.
In Hirata Estate Hidden Temple Revisited: Unique location from Owl. Replaces Aromatic Flower, Memory: Foster Father.
In Abandoned Dungeon: Unique location from Shichimen Warrior. Replaces Ceremonial Tanto.
In Abandoned Dungeon: Unique item sold by Dungeon Memorial Mob. Replaces Prayer Bead.
In Senpou Temple: Unique location from Armored Warrior. Replaces Breath of Nature: Shadow, Prayer Bead.
In Senpou Temple: In the main room of the cricket building, in front of the Infested Seeker. Replaces Gourd Seed.
In Senpou Temple: Dropped by Long Arm Centipede Sen-Un. Replaces Prayer Bead.
In Senpou Temple Grounds: Inside of the pagoda after the cave acessible near the Main Hall side entrance. Replaces Senpou Esoteric Text.
In Senpou Temple Grounds: Underwater in the Temple Grounds pond. Replaces Prayer Bead.
In Senpou Temple Inner Sanctum: Unique drop from Folding Screen Monkeys. Replaces Memory: Screen Monkeys, Puppeteer Ninjutsu.
In Senpou Temple Inner Sanctum: Given by the Divine Child. Replaces Mortal Blade.
In Upper Sunken Valley: In the room with Long-arm Centipede Giraffe in front of the statue. Replaces Large Fan.
In Upper Sunken Valley: After two tree branch grapples in Under-Shrine Valley, rather than going right toward the Sunken Valley Sculptor's Idol, climb up the wall to the left and follow that path. Replaces Gourd Seed.
In Upper Sunken Valley: Dropped by Snake Eyes Shirafuji. Replaces Prayer Bead.
In Upper Sunken Valley: Dropped by Long-arm Centipede Giraffe. Replaces Prayer Bead.
In Upper Sunken Valley: In the area before the Headless cave, found going backwards from the Under-Shrine Valley Sculptor's Idol. Replaces Prayer Bead.
In Sunken Valley Passage: Unique location from Guardian Ape. Replaces Memory: Guardian Ape, Slender Finger.
In Sunken Valley Passage: After Guardian Ape. Replaces Lotus of the Palace.
In Sunken Valley Passage Shrine: Held by a statue after the shrine building. Replaces Dried Serpent Viscera.
In Sunken Valley Passage after Snake Deathblow: Unique location from Great Serpent. Replaces Fresh Serpent Viscera.
In Poison Pool: Dropped by Snake Eyes Shirahagi. Replaces Prayer Bead.
In Guardian Ape's Burrow: Unique location from Guardian Ape. Replaces Bestowal Ninjutsu.
In Guardian Ape's Burrow: Rather than dropping down into the burrow, grapple to the left and wall jump up to the cliff edge overlooking Poison Pool, and then grapple onto the nearby statue's head. Replaces Prayer Bead.
In Guardian Ape's Burrow: Unique drop from Headless Ape. Replaces Memory: Headless Ape, Prayer Bead, Prayer Bead.
In Guardian Ape's Burrow: Unique location from Shichimen Warrior. Replaces Malcontent's Ring.
In Hidden Forest: Dropped by the Mist Noble in the temple. Replaces Lump of Grave Wax.
In Hidden Forest: Dropped by Tokujiro the Glutton. Replaces Prayer Bead.
In Mibu Village: Unique location from Corrupted Monk. Replaces Mibu Breathing Technique, Memory: Corrupted Monk.
In Mibu Village: On the cave altar. Replaces Shelter Stone.
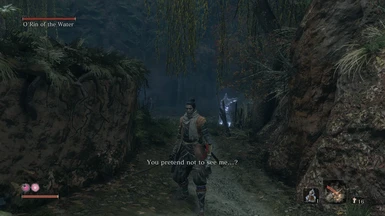
In Mibu Village: Unique location from O'Rin. Replaces Breath of Life: Shadow, Prayer Bead.
In Mibu Village: In front of the tree in the area with many underground villagers. Replaces Gourd Seed.
In Mibu Village: On a small shrine in the upper floor of the Head Priest's house. Replaces Prayer Bead.
In Mibu Village: In a chest at the bottom of the village pond. Replaces Prayer Bead.
In Fountainhead Vermillion Bridge: Unique drop from True Monk. Replaces Memory: True Monk, Dragon's Tally Board.
In Fountainhead Palace: Unique location from Sakura Bull of the Palace. Replaces Prayer Bead.
In Fountainhead Palace: Unique location from Divine Dragon. Replaces Divine Dragon's Tears, Memory: Divine Dragon.
In Fountainhead Palace: Unique location from Shichimen Warrior. Replaces Lapis Lazuli.
In Fountainhead Palace: In a chest in the Palace Grounds building. Replaces Gourd Seed.
In Fountainhead Palace: Unique drop from Okami Leader Shizu. Replaces Prayer Bead.
In Fountainhead Palace: In the chest guarded by the two Underwater Headless. Replaces Prayer Bead.
If Headless locations are allowed to be important, these are also added:
In Ashina Outskirts Courtyard: Unique location from Headless. Replaces Ako's Spiritfall.
In Ashina Castle: Unique location from Underwater Headless. Replaces Ungo's Spiritfall.
In Hidden Forest: Unique location from Headless. Replaces Gachiin's Spiritfall.
In Upper Sunken Valley: Dropped by the Headless found going backwards from the Under-Shrine Valley Sculptor's Idol and under the pond. Replaces Gokan's Spiritfall.
In Fountainhead Palace: Unique location from Underwater Headless. Replaces Yashariku's Spiritfall.
A comprehensive enemy and item randomizer for Sekiro, including boss randomization and key item randomization.
Things to definitely know for item randomizer
- The first castle invasion starts when you have Mortal Blade, Shelter Stone, and Lotus of the Palace; you have Isshin asked about the Mortal Blade location in the watchtower (talked to him twice); and you are in Senpou Temple/Sunken Valley/Ashina Depths/Hirata Temple.
- You can get into Ashina Castle after the first invasion even if you can't swim underwater, through the Ashina Reservoir gate
- To enter Hirata Estate without the Shinobi Prosthetic, do a running jump, holding forward the whole time, onto the tree branch you could otherwise grapple onto (see https://streamable.com/u7d7y). If you get stuck in water, you may have to use Homeward Idol to get out.
Things to definitely know for enemy randomizer
- Game progression things that apply to enemies will apply to their replacements instead. e.g. killing Guardian Ape's replacement will spawn Headless Ape's replacement.
- Armored Warrior will now fall off the edge of anything the game considers a floor collision. This is easiest off of ledges/cliffs. If there is no ledge/cliff, kick him into a wall or a rock. He only shows up in arenas where this is possible, but you may have to try a few spots.
If you have issues installing the mod, or would like to provide feedback/participate in beta tests, you can join the discord server at https://discord.gg/QArcYud
Installation
To install and run:
1. From the Files tab of the mod page, download Sekiro Randomizer, and also the latest official Sekiro Mod Engine release. You will also need to download Combined SFX if you haven't unpacked the game using UXM, and Divine Dragon Textures if you want Divine Dragon to have textures when randomized.
2. Add the randomizer directory directly into the Sekiro.exe directory from SekiroRandomizer.zip (*not* into an existing mods or parts directory).
3. Install Sekiro Mod Engine. If the last time you downloaded a version of Mod Engine was before November 2020, you must the new official version instead. It allocates 200 MB additional memory for sound files and is required for avoiding crashes. It should suffice to copy dinput8.dll and modengine.ini into your Sekiro directory.
4. Change modengine.ini to have modOverrideDirectory="\randomizer", if it's not already.
5. All enemy sfx should be combined, since otherwise many of their attacks won't be visible. There are two ways to do this.
5a. Download CombinedSFX.zip (76 MB download) and extract the sfx directory into the randomizer directory.
5b. Alternatively, unpack Sekiro using UXM (needs about 14 GB disk space) and the randomizer will combine the SFX automatically on startup. This will take a few seconds. (After this, the sfx directory should match the above screenshots.)
6. Likewise, you can download the Divine Dragon texture files (18 MB download) so that more of the textures appear when Divine Dragon is moved to other maps. This doesn't affect the enemy, just the Sakura trees around it.
7. Run the randomizer, checking "Reroll seed" to create a new run. If you plan on using other mods: use the "Merge mods" option under Misc. (For instance, if you have a mod with text edits or param edits, put the files in mods folder, not randomizer folder.) Never copy files into the randomizer if they already exist there, because they will not be merged correctly and will break your game. For Poorly Translated Mod, make sure to uncheck "Edit in-game text".
8. Make sure that the randomizer succeeds (shows "Done" in the status bar), and then close Sekiro if you have it open, and start up Sekiro for changes to be reflected, and create a new save file.
To uninstall, change back modOverrideDirectory="\mods", or delete the randomizer directory. The new version of mod engine will also work for previous mods, if you don't mind the extra memory allocation.
Gameplay details
To repeat "Things to definitely know" from above:
Things to definitely know for item randomizer
- The first castle invasion starts when you have Mortal Blade, Shelter Stone, and Lotus of the Palace; you have Isshin asked about the Mortal Blade location in the watchtower (talked to him twice); and you are in Senpou Temple/Sunken Valley/Ashina Depths/Hirata Temple.
- You can get into Ashina Castle after the first invasion even if you can't swim underwater, through the Ashina Reservoir gate
- To enter Hirata Estate without the Shinobi Prosthetic, do a running jump, holding forward the whole time, onto the tree branch you could otherwise grapple onto (see https://streamable.com/u7d7y). If you get stuck in water, you may have to use Homeward Idol to get out.
Things to definitely know for enemy randomizer
- Game progression things that apply to enemies will apply to their replacements instead. e.g. killing Guardian Ape's replacement will spawn Headless Ape's replacement.
- Armored Warrior will now fall off the edge of anything the game considers a floor collision. This is easiest off of ledges/cliffs. If there is no ledge/cliff, kick him into a wall or a rock. He only shows up in arenas where this is possible, but you may have to try a few spots.
If you encounter any issues, like softlocks from inaccessible items or unbeatable enemies, feel free to report a bug. It will help a lot if you include the log in the 'spoiler_logs' folder, or at least the full first line of the log (starting with "Options and seed"). The seed by itself probably won't help.
Here are some misc hints and tips, but not strictly required to know:
Misc general info
- There is a hint/spoiler log that is generated and put in the 'spoiler_logs' folder. Check it out if you are lost or want to check enemy placements.
- For convenience, tutorials pop-ups have been removed.
- It should be fine to re-run the randomizer with a different seed after starting NG+ playthroughs, although some bugs may arise if multiple items are added to the same location.
- The "Open Bell Demon's Temple" option allows you to get to Ashina Castle without defeating Gyoubu, although you must eventually go back to complete Isshin's quest. See https://streamable.com/fywve for a demonstration of this.
Misc info about enemy randomizer
- Sword Saint Isshin, Divine Dragon, and True Monk don't require Mortal Blade to deathblow.
- You can get to Genichiro, skipping Ashina Elite Jinsuke Saze, by going through a breakable wall down the stairs from the Ashina Dojo idol toward Isshin's watchtower
Misc info about item randomizer
- Remember that additional enemies spawn in Guardian Ape's Burrow after defeating Guardian Ape, and Fujioka will also sell Valley Apparitions Memo when the final enemy spawns.
- Item logic assumes that you can get into Sunken Passage Serpent Shrine if you have either Puppeteer Ninjutsu or Mist Raven's Feathers.
- There are options like 'Item availability similar to base game' which I would strongly recommend. Otherwise, at high biases, it is possible for e.g. all Gourd Seeds and Memories to be in Fountainhead Palace.
There are also some features I'm looking to implement in the future. Let me know if any of these would be interesting, or if you have any other suggestions:
- Enemy Onslaught
- Randomizing Bell Demon, Kusabimaru, or Healing Gourd
- Adding boss vs boss or multi-boss fights
If you're looking for a different way to do randomizer runs, try out Sekiro Randomizer Bingo by DistractionCrab. The bingo is designed around winning when you get 5 squares in a row, so getting to an ending is not required. You can mark a square as green if you achieve it, and mark it as red if you violate its restrictions.
Presets
The randomizer can be heavily customized using text files in the 'presets' folder. These can be selected in the UI under "Challenge runs" and add some significant challenge or fun to runs. You can also create your own: there is a template you can copy. Check out README.txt in the presets folder to learn more. In v0.2 presets are more focused on enemy randomization, but there is some item randomizer customization support, and more coming in the future. Built-in presets include:
- 10% Boss Replacement: The same as regular randomization except that 10% of enemies are upgraded to bosses
- Ashina Zoo: Replace all enemies and bosses with animals and occasionally some animal caretakers
- Nightmare Mode: The worst run with the most annoying and challenging enemies which might be possibly doable
- No Demon of Hatred: The same as regular randomization but prevent Demon of Hatred from appearing
- Oops! All: All enemies in the game are replaced with a specific enemy type
- Reverse Enemy Order: Place all enemies in the game roughly based on how soon you can find them in a full playthrough, but in reverse order
The NPC definition for regular enemies can become slightly buffed when they become minibosses or bosses, so as always, it is important to restart the game after applying one of these so that they are reflected.
In-game hints
In English, item descriptions of otherwise nonfunctional lore items will be slightly altered to provide hints for the placement of other items. This will also edit the text of all readable notes in the world, like the Headless warning sign, the Lightning Reversal scroll, and the Folding Screen Monkey hints.The hints are balanced so they require some deductive reasoning and not spoil too much of the run. There is no guarantee that hints can always be found before they are needed, since the placement of hint items in the world is completely random. The hints are split up into these categories:
- Positive location hints: An item can be found in a location type in a location. Location types includes chests, underwater, treasure (item pickup on the ground or gift), boss, miniboss, powerful enemy (includes bosses and minibosses), and in shops. These hints exist for some important optional items (like Mikiri Counter, Shuriken, Firecrackers), but if a key item name is given, that item is required to beat the run.
- Lateness hints: A specific item can be found early/late/midway through the game. These hints are transitive, so Hirata can be considered late-game if the Bell Charm is in Fountainhead Palace. The definition of early items are those which can be acquired before reaching Ashina Castle through Blazing Bull; late items cannot be acquired until after you reach Fountainhead Palace; mid items are neither.
- Negative location hints: The given location doesn't have any important items at all, using the above definition of important items (key items required to beat the final Immortal Severence boss, or an important skill). These are kept as general as possible, so if the hint is for Gun Fort not having an important item, it's probably the case that Bodhisattva Valley might have one, since otherwise the hint would say all of Sunken Valley.
- Negative type hints: The particular type of location doesn't have any important items in the entire game. For instance, this might say that you don't have to search underwater or look in shops.
- Negative location type hints: The given location doesn't have important items in a certain location type. This is also kept as general as possible, so if the hint is for minibosses in Hirata Estate, it's probably the case that other locations in Hirata Estate will have something instead (since otherwise the hint would say the entirety of Hirata Estate), and also probably the case that a boss will have it (since otherwise the hint would say powerful enemies).
Acknowledgements
The fantastic art in the randomizer UI (the title and hand-drawn characters) was made specially for the randomizer by Souv, who has also created many wonderful emotes for the FromSoft modding discord server (https://discord.gg/mT2JJjx). Thanks to JesterPatches, Tolvo, and Shoobe for their valuable alpha testing feedback, DistractionCrab for testing feedback for later versions, and JP for some of the lovely screenshots as well. Thanks to katalash, who made DSTools and DSMapStudio and made a version of Mod Engine which fixed the audio crashes. Thanks to TKGP and Pav and others for SoulsFormats and Paramdex, and Pav for the CE table which was useful for testing. Thanks to HotPocketRemix and Meowmaritus and AinTunez for developing tools for event script editing which this mod uses. Thanks to everyone else who helped debug issues and provide feedback. The initial version of this project took 3-4 months of development time and makes some really advanced dynamic edits to game scripts and systems, and with the things we've learned, I'd love to see more gameplay-oriented Sekiro mods like it.
Finally check out the source code on GitHub.
Key items
Key items are defined as items which unlock other unmissable items. They are only placed in unmissable locations, which excludes many of the game's non-main quests. These items, and no others, can block your progress in the randomizer until you find them, with the ultimate goal of defeating the final Immortal Severence boss and getting to the credits.
- Aromatic Branch: One of the four incense ingredients used to access Fountainhead Palace
- Divine Dragon's Tears: Used to end the game when talking to Kuro in the silvergrass field
- Father's Bell Charm: Used to revisit Hirata after Lady Butterfly has already been defeated
- Gatehouse Key: Used to access the locked building in Ashina Reservoir
- Gun Fort Shrine Key: Used to access Sunken Valley Passage after Gun Fort
- Hidden Temple Key: Used to access the Lady Butterfly fight from Hirata Estate
- Lotus of the Palace: One of three incense ingredients used to trigger the Interior Ministry invasion, and one of four used to access Fountainhead Palace
- Mibu Breathing Technique: Used to access many underwater areas in the game (in Fountainhead Palace, Hirata Estate, Senpou Temple Grounds, Mibu Village, Ashina Castle, Ashina Reservoir, Abandoned Dungeon, Riven Cave, Guardian Ape's Watering Hole, and the Sunken Valley Headless)
- Mist Raven's Feathers: Can be used to get past the cave snake in Sunken Valley Passage
- Mortal Blade: One of three incense ingredients used to trigger the Interior Ministry invasion, and one of four used to access Fountainhead Palace
- Puppeteer Ninjutsu: Can be used to get past the cave snake in Sunken Valley Passage, and access Sunken Valley Cavern from Senpou Temple
- Secret Passage Key: Used to access the final boss
- Shelter Stone: One of three incense ingredients used to trigger the Interior Ministry invasion, and one of four used to access Fountainhead Palace
- Shinobi Prosthetic: Required to access most of the game past Dilapidated Temple and some early parts of Hirata Estate
- Truly Precious Bait: Used in Fountainhead Palace to unlock an item in Sunken Valley Passage
- Young Lord's Bell Charm: Used to access Hirata Estate from Dilapidated Temple
You can use Sekiro Tracker by DistractionCrab for keeping track of key items collected in a run, for streams and/or personal record-keeping.
Important locations
Some items have the option to be placed in "important locations". This can be used for shorter runs or live races. If enabled, all of the same item logic still applies, so it shouldn't be possible to get softlocked. Generally, these include the vanilla locations of bosses, minibosses, prayer beads, gourd seeds, prosthetics, esoteric texts, key items, and serpent viscera. Currently, they are:
In Dilapidated Temple: Given upon arriving in Dilapidated Temple. Replaces Shinobi Prosthetic.
In Dilapidated Temple: Unique initial item sold by Fujioka the Info Broker. Replaces Gourd Seed.
In Dilapidated Temple: Given by the Sculptor after acquiring 1 skill point. Replaces Shinobi Esoteric Text.
In Dilapidated Temple: Given by the Sculptor after collecting 3 prosthetic tools. Replaces Prosthetic Esoteric Text.
In Ashina Outskirts Gate Path: On the second floor of the building next to the Gate Path Sculptor's Idol, or in the Offering Box after the second invasion. Replaces Shuriken Wheel.
In Ashina Outskirts Gate Path: Dropped by General Naomori Kawarada, or in Offering Box after the Central Forces invasion. Replaces Gourd Seed, Prayer Bead.
In Ashina Outskirts Stairway: Unique item sold by Crow's Bed Memorial Mob and Battlefield Memorial Mob. Replaces Robert's Firecrackers.
In Ashina Outskirts Stairway: Given by Inosuke's Mother. Replaces Young Lord's Bell Charm.
In Ashina Outskirts Stairway: Unique location from Chained Ogre. Replaces Shinobi Medicine Rank 1, Prayer Bead.
In Ashina Outskirts Courtyard: In the left room of the lookout building after Chained Ogre. Replaces Gourd Seed.
In Ashina Outskirts Courtyard: Dropped by General Tenzen Yamauchi, or in the Offering Box after the Central Forces invasion. Replaces Prayer Bead.
In Ashina Castle Fortress: Unique location from Gyoubu Oniwa. Replaces Memory: Gyoubu Oniwa, Mechanical Barrel.
In Ashina Castle Gate: Unique item sold by Battlefield Memorial Mob. Replaces Gourd Seed.
In Ashina Castle Gate: Given by Tengu after killing rats, or in his spot in Ashina Castle if the quest is refused and after Divine Dragon. Replaces Ashina Esoteric Text.
In Ashina Castle Gate: Unique location from Blazing Bull. Replaces Shinobi Medicine Rank 2, Prayer Bead.
In Ashina Castle Gate: In a chest on the top floor of the building up the stairs after Gyoubu. Replaces Prayer Bead.
In Ashina Outskirts after Central Forces: Unique location from Demon of Hatred. Replaces Lapis Lazuli, Memory: Hatred Demon.
In Ashina Outskirts after Central Forces: Dropped by Shigekichi of the Red Guard. Replaces Prayer Bead.
In Ashina Reservoir: Dropped by a soldier on the bridge leading to the Abandoned Dungeon entrance, or in the courtyard immediately to the left after the Ashina Castle Sculptor's Idol. Replaces Gatehouse Key.
In Ashina Reservoir: Dropped by Seven Ashina Spears - Shikibu Toshikatsu Yamauchi, or in the Offering Box after the Central Forces invasion. Replaces Prayer Bead.
In Ashina Reservoir: Dropped by Lone Shadow Longswordsman. Replaces Prayer Bead.
In Ashina Reservoir: In the chest in Ashina Reservoir Gate House. Replaces Gyoubu's Broken Horn.
In Ashina Reservoir after Central Forces: Dropped by Seven Ashina Spears - Shume Masaji Oniwa. Replaces Prayer Bead.
In Ashina Reservoir Ending: Unique location from Sword Saint Isshin. Replaces Memory: Saint Isshin, Dragon Flash.
In Ashina Castle: Dropped by Genichiro. Replaces Memory: Genichiro, Bloodsmoke Ninjutsu.
In Ashina Castle: In the library area in Kuro's Room which opens up after you ask Isshin where the Mortal Blade can be found. Replaces Gun Fort Shrine Key.
In Ashina Castle: In a chest in the Upper Tower basement. Replaces Sabimaru.
In Ashina Castle: Sold by Blackhat Badger, or left behind after he moves to Senpou Temple, or in Offering Box if killed. Replaces Iron Fortress.
In Ashina Castle: In a chest before the Upper Tower Antechamber. Replaces Gourd Seed.
In Ashina Castle: Dropped by General Kuranosuke Matsumoto, or in the Offering Box after the Interior Ministry invasion. Replaces Prayer Bead.
In Ashina Castle: Dropped by Ashina Elite Jinsuke Saze, or in the Offering Box after the Interior Ministry invasion. Replaces Prayer Bead.
In Ashina Castle: In a chest past a scroll-covered shinobi door in the Upper Tower room where two fencers are studying a map. Replaces Prayer Bead.
In Ashina Castle after Interior Ministry: Unique location from Owl. Replaces Aromatic Branch, Memory: Great Shinobi.
In Ashina Castle after Interior Ministry: Dropped by Isshin Ashina. Replaces One Mind.
In Ashina Castle after Interior Ministry: Unique location from Chained Ogre. Replaces Shinobi Medicine Rank 3, Prayer Bead.
In Ashina Castle after Interior Ministry: Dropped by Lone Shadow Vilehand. Replaces Prayer Bead.
In Ashina Castle after Interior Ministry: Dropped by Lone Shadow Masanaga the Spear-bearer, or in the Offering Box after the Central Forces invasion. Replaces Prayer Bead.
In Ashina Castle after Central Forces: Given by Emma in Kuro's Room after Divine Dragon. Replaces Secret Passage Key.
In Ashina Castle after Central Forces: Dropped by Ashina Elite Ujinari Mizuo. Replaces Prayer Bead.
In Hirata Estate: Near the bandits' bonfire. Replaces Flame Barrel.
In Hirata Estate: In the shrine where you can eavesdrop bandits arguing about whether to loot the shrine. Replaces Shinobi Axe of the Monkey.
In Hirata Estate: Dropped by Shinobi Hunter Enshin of Misen. Replaces Prayer Bead.
In Hirata Estate: Dropped by Juzou the Drunkard. Replaces Prayer Bead.
In Hirata Audience Chamber: In a chest behind the scroll-covered shinobi door before the Audience Chamber. Replaces Prayer Bead.
In Hirata Estate Hidden Temple: Unique location from Lady Butterfly. Replaces Memory: Lady Butterfly, Sakura Droplet.
In Hirata Estate Revisited: Dropped by Lone Shadow Masanaga the Spear-bearer. Replaces Prayer Bead.
In Hirata Estate Revisited: Dropped by Juzou the Drunkard. Replaces Prayer Bead.
In Hirata Estate Hidden Temple Revisited: Unique location from Owl. Replaces Aromatic Flower, Memory: Foster Father.
In Abandoned Dungeon: Unique location from Shichimen Warrior. Replaces Ceremonial Tanto.
In Abandoned Dungeon: Unique item sold by Dungeon Memorial Mob. Replaces Prayer Bead.
In Senpou Temple: Unique location from Armored Warrior. Replaces Breath of Nature: Shadow, Prayer Bead.
In Senpou Temple: In the main room of the cricket building, in front of the Infested Seeker. Replaces Gourd Seed.
In Senpou Temple: Dropped by Long Arm Centipede Sen-Un. Replaces Prayer Bead.
In Senpou Temple Grounds: Inside of the pagoda after the cave acessible near the Main Hall side entrance. Replaces Senpou Esoteric Text.
In Senpou Temple Grounds: Underwater in the Temple Grounds pond. Replaces Prayer Bead.
In Senpou Temple Inner Sanctum: Unique drop from Folding Screen Monkeys. Replaces Memory: Screen Monkeys, Puppeteer Ninjutsu.
In Senpou Temple Inner Sanctum: Given by the Divine Child. Replaces Mortal Blade.
In Upper Sunken Valley: In the room with Long-arm Centipede Giraffe in front of the statue. Replaces Large Fan.
In Upper Sunken Valley: After two tree branch grapples in Under-Shrine Valley, rather than going right toward the Sunken Valley Sculptor's Idol, climb up the wall to the left and follow that path. Replaces Gourd Seed.
In Upper Sunken Valley: Dropped by Snake Eyes Shirafuji. Replaces Prayer Bead.
In Upper Sunken Valley: Dropped by Long-arm Centipede Giraffe. Replaces Prayer Bead.
In Upper Sunken Valley: In the area before the Headless cave, found going backwards from the Under-Shrine Valley Sculptor's Idol. Replaces Prayer Bead.
In Sunken Valley Passage: Unique location from Guardian Ape. Replaces Memory: Guardian Ape, Slender Finger.
In Sunken Valley Passage: After Guardian Ape. Replaces Lotus of the Palace.
In Sunken Valley Passage Shrine: Held by a statue after the shrine building. Replaces Dried Serpent Viscera.
In Sunken Valley Passage after Snake Deathblow: Unique location from Great Serpent. Replaces Fresh Serpent Viscera.
In Poison Pool: Dropped by Snake Eyes Shirahagi. Replaces Prayer Bead.
In Guardian Ape's Burrow: Unique location from Guardian Ape. Replaces Bestowal Ninjutsu.
In Guardian Ape's Burrow: Rather than dropping down into the burrow, grapple to the left and wall jump up to the cliff edge overlooking Poison Pool, and then grapple onto the nearby statue's head. Replaces Prayer Bead.
In Guardian Ape's Burrow: Unique drop from Headless Ape. Replaces Memory: Headless Ape, Prayer Bead, Prayer Bead.
In Guardian Ape's Burrow: Unique location from Shichimen Warrior. Replaces Malcontent's Ring.
In Hidden Forest: Dropped by the Mist Noble in the temple. Replaces Lump of Grave Wax.
In Hidden Forest: Dropped by Tokujiro the Glutton. Replaces Prayer Bead.
In Mibu Village: Unique location from Corrupted Monk. Replaces Mibu Breathing Technique, Memory: Corrupted Monk.
In Mibu Village: On the cave altar. Replaces Shelter Stone.
In Mibu Village: Unique location from O'Rin. Replaces Breath of Life: Shadow, Prayer Bead.
In Mibu Village: In front of the tree in the area with many underground villagers. Replaces Gourd Seed.
In Mibu Village: On a small shrine in the upper floor of the Head Priest's house. Replaces Prayer Bead.
In Mibu Village: In a chest at the bottom of the village pond. Replaces Prayer Bead.
In Fountainhead Vermillion Bridge: Unique drop from True Monk. Replaces Memory: True Monk, Dragon's Tally Board.
In Fountainhead Palace: Unique location from Sakura Bull of the Palace. Replaces Prayer Bead.
In Fountainhead Palace: Unique location from Divine Dragon. Replaces Divine Dragon's Tears, Memory: Divine Dragon.
In Fountainhead Palace: Unique location from Shichimen Warrior. Replaces Lapis Lazuli.
In Fountainhead Palace: In a chest in the Palace Grounds building. Replaces Gourd Seed.
In Fountainhead Palace: Unique drop from Okami Leader Shizu. Replaces Prayer Bead.
In Fountainhead Palace: In the chest guarded by the two Underwater Headless. Replaces Prayer Bead.
If Headless locations are allowed to be important, these are also added:
In Ashina Outskirts Courtyard: Unique location from Headless. Replaces Ako's Spiritfall.
In Ashina Castle: Unique location from Underwater Headless. Replaces Ungo's Spiritfall.
In Hidden Forest: Unique location from Headless. Replaces Gachiin's Spiritfall.
In Upper Sunken Valley: Dropped by the Headless found going backwards from the Under-Shrine Valley Sculptor's Idol and under the pond. Replaces Gokan's Spiritfall.
In Fountainhead Palace: Unique location from Underwater Headless. Replaces Yashariku's Spiritfall.